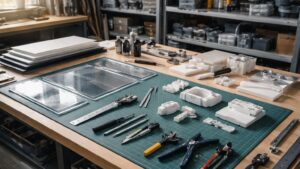
Foam & Plastics Fabrication on Crank Street is where lightweight materials meet heavyweight creativity. This is your lane for turning sheets, blocks, and pellets into prototypes, cosplay armor, signage, packaging, and real working parts. Whether you’re slicing EVA foam with a craft knife, heat-bending acrylic, or dialing in a hot-wire cutter for flawless edges, you’ll find project ideas and build guides sized to your tools and experience. We’ll dig into cutting, shaping, bonding, thermoforming, and finishing techniques that make foam and plastics look clean, crisp, and professional—not like last-minute craft projects. Along the way, you’ll learn how to choose the right material for impact resistance, flexibility, weight, or transparency, and how to avoid warping, melting, and messy glue lines. From shop jigs and prop builds to display stands and organizers, Foam & Plastics Fabrication on Crank Street gives you the know-how to move from rough mockups to dialed-in, repeatable parts that look ready for production.
A: Begin with simple foam organizers, prop panels, and flat plastic projects to learn cutting and gluing.
A: Not at first. Many Crank Street projects are doable with knives, a heat gun, and a few hand tools.
A: EVA foam is popular for armor and props because it’s light, flexible, and easy to heat-shape.
A: Score repeatedly with a sharp blade, then snap over a straight edge or use fine-tooth saws.
A: Seal it with a flexible primer or coating, then use multiple thin paint layers instead of one heavy coat.
A: Yes—ventilate, wear masks, and avoid overheating or burning materials when shaping or gluing.
A: Choose UV-stable plastics and seal foam edges; expect some aging from sun and weather.
A: Combine mechanical features—tabs, slots, overlaps—with the right adhesive and surface prep.
A: Work with thin foam and inexpensive sheet plastic to test shapes before final builds.
A: Focus on symmetry, clean edges, hidden seams, and consistent finishes—they instantly look more professional.